Orange Zucchini Bread

I recently got the book Tartine at Half Price Books and knew that I had to try the Zucchini Marmalade Tea Cake out for 2 reasons.

  1. Zucchini is one of my most hated vegetables and since my zucchini plants currently are outdoing themselves in terms of production, I needed a way to get rid of large amounts of zucchini, FAST.
  2. I really dislike marmalade and guess who also happens to have a jar of half used marmalade in the fridge?
  3. My grandparents gave me 2 huge bags of chopped walnuts from their recent food bank haul. I hate walnuts.

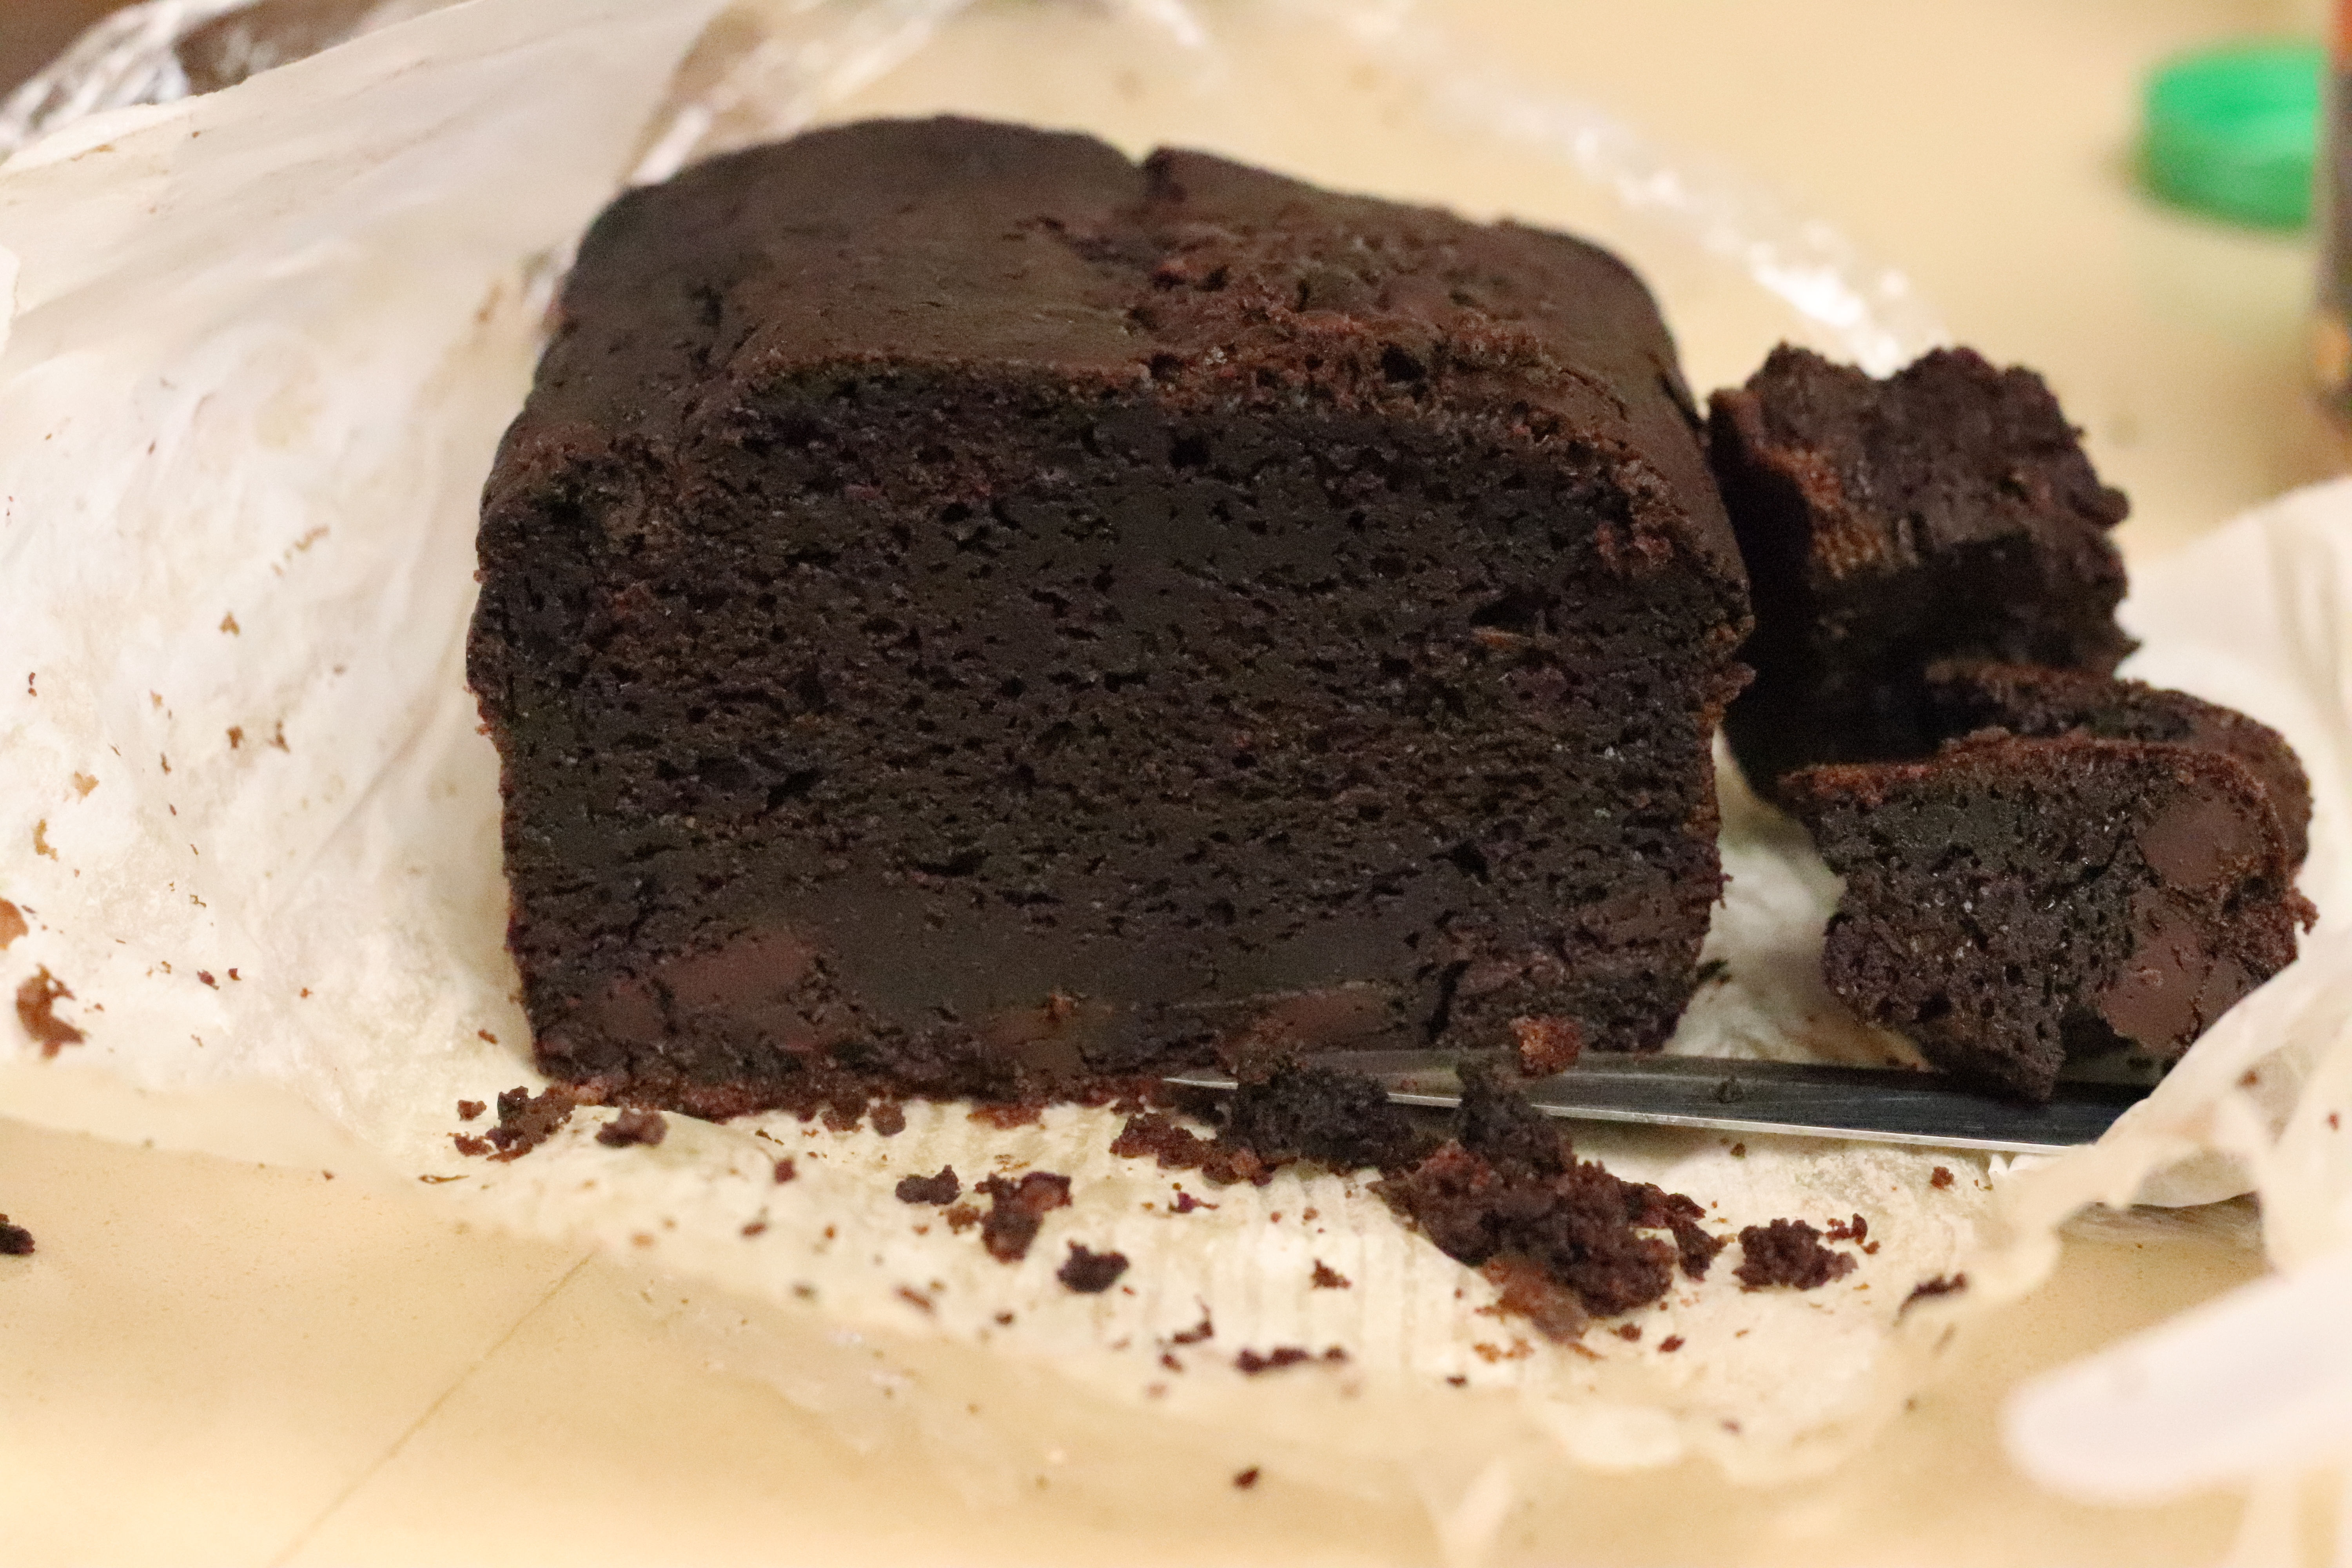
In short, this was the fridge cleaner cake that combined all of my most hated things in hope that the oven will work its magic and transform them into something edible. It worked! Once baked into a loaf, the zucchini lost its musty flavor and mushy texture, the marmalade lost its bitterness, and the walnuts lost their tannic quality. The loaf just tasted like great spice cake with a slight orange aroma. While I still was not a fan of the orange, it was much more tolerable to have it in cake than spread onto toast.

I made a few variations to the recipe, namely substituting spelt flour in place of all purpose and adding a mix of spices. The spelt gave a nice hearty feel to the loaf as well as a nuttiness that covered up the unpleasant taste of the marmalade quite well. The crumb was amazing; moist , fluffy, and even, making the cake rich but not overly so. I will probably bake this again with apricot jam once I use up all my marmalade.

A “monster zucchini” from our garden.

Ingredients

  • 270 grams whole grain spelt flour
  • Β½ teaspoon baking soda
  • Β½ teaspoon baking powder
  • 1 teaspoon ground cinnamon
  • 1/2 teaspoon ground nutmeg
  • 1/4 teaspoon cloves
  • 2 large eggs 
  • 140 grams canola oil
  • 150 grams granulated sugar
  • 115 grams orange marmalade 
  • 285 grams grated zucchini – about 3 med. (I used 1/4 of a HUGE yellow one)
  • 115 grams chopped walnuts

Procedure

In a mixer, whip the eggs, sugar and spices together until fluffy. Gradually drizzle in the oil. Add the marmalade and mix until combined. Add the grated zucchini and walnuts and mix until combined. In another bowl, sift the spelt flour, baking soda, and baking powder together. Sift them into the wet ingredients and carefully fold to combine, making sure that everything is evenly incorporated and little gluten as formed. Dump into a loaf pan that has been greased and lined in parchment paper and bake at 350 F for around 1 hour (until toothpick comes out clean). If the top starts getting too brown, cover it with foil and return to the oven to continue baking. Once done baking, wait around 45 mins for it to fully cool and enjoy!

Black Forest Trifle

If you’ve read my previous post about my failed chocolate rye cake, you know that I still have half a loaf of the failed cake left (that I really don’t want to eat). This trifle was created by my desire to rid the fridge of old cherries and gross chocolate rye cake. Wow, was this extra effort worth it!

By making this trifle, I realized that chocolate, rye, and cherry combine to make one of the best flavor combinations known to man. These rich flavors are perfectly balanced by the lightness of the whipped cream, making this one of my favorite desserts ever. HIGHLY RECOMMEND!

Ingredients

Procedure

Crumble rye cake. Add whipped cream. Add cherry compote. Repeat and chill for at least 30 mins. After 30 mins, take the trifle out of the fridge and dig your spoon in and savor one of the most delicious desserts ever made!

Spicy Corn Bread!

Flavored with cayenne and honey, this cornbread is a mix between the sweet northern style and savory southern style. Feel free to eat it plain or serve with a hearty bowl of chili.

Ingredients

  • 57g Β (1/4 cup) butter (plus a few tablespoons to melt in the pan)
  • 1/3 cupΒ (75g)Β honey
  • 1Β egg
  • 1 cupΒ 240ml)Β buttermilk
  • 120g Β (1 cup)Β cornmeal
  • 125g Β (1 cup)Β all-purpose flourΒ 
  • 1 teaspoonΒ bakingΒ powder
  • 1/2 teaspoonΒ baking soda
  • 1/2 teaspoonΒ salt
  • 175g Β (1/2 cup)Β corn
  • 1/4 teaspoon cayenneΒ 

Procedure

In a bowl, whisk together the baking powder, baking soda, salt, flour, cayenne, and cornmeal. In another bowl, combine the melted butter, honey, egg, and buttermilk. Fold the wet and dry ingredients together and add in the corn. In a cast iron skillet, melt the butter on medium heat. Add the batter and bake in a 350 F oven until the center springs back when pressed, around 20 mins.

Let cool for 15 mins and enjoy!

Cherry Compote

Last week, my grandparents decided to gift us 2 whole boxes of cherries that they bought from Costco. While I was thankful that they cared enough to send us some, two entire boxes is really a bit too much for a family of four (or more like three because my mom doesn’t really eat fruits). I have therefore been gorging myself on cherries this past week and as of yesterday I have officially had enough. I decided to get rid of all the leftover cherries in a cherry compote.

Ingredients

  • 500 grams of cherries
  • 2 tbs sugar
  • 1 tsp brandy
  • 1 tsp balsamic vinegar

Procedure

Place pitted cherries and sugar in a saucepan on high heat and heat until the sugar melts. Add the brandy and balsamic and stir until the alcohol evaporates and the cherries are soft. Transfer to a container and place in the fridge to cool. Serve with yogurt or ice cream.

Chocolate Rye Cake

Too dense and gummy on the inside…..

I baked a chocolate loaf cake yesterday but I decided to replace 1/2 of the regular flour with rye flour. It was an absolute disaster. Not only did the cake take an extra half hour to bake, when I sliced into it the next morning, the interior was spongy and gummy.

The recipe I used was from Two Peas and Their Pod. I have baked the loaf cake with all purpose flour before and although it turned out wetter than I would have preferred, it was drastically better than this disappointment of a cake.

Now I need to think of a way to use this cake up.

Whole Wheat Coffee Cake

Since she hates frosting, coffee cake is the only cake (besides pound cake) that my mom actually eats. This was therefore one of the first cakes that I tried out using 100% whole wheat and it turned out an absolute success! Tender, moist, and packed full of whole grain flavor, you’ll be finding yourself making this time and time again.

Ingredients

Topping

  • 70g (1/3 cup) brown sugar
  • 1 teaspoon cinnamon
  • 1 tbs whole wheat flour
  • 15g butter

Cake

  • 240g (2 cups) whole wheat pastry flour
  • 1 teaspoon baking powder
  • 1 teaspoon baking soda
  • 1/2 teaspoon salt
  • 150g (2/3 cup) granulated sugar
  • 2 eggs
  • 1 teaspoon vanilla
  • 242g (1 cup) sour cream
  • 113g (1 stick) butter

Procedure

Mix cinnamon, brown sugar, butter and flour in a bowl. Set aside.

In a mixer, beat the butter, vanilla, and sugar until light and fluffy. Add the eggs one at a time and then add the sour cream. Combine the dry ingredients in a bowl and add it into the butter mixture. Mix until it is just combined and transfer into your baking pan. Add the cinnamon topping and bake in a 350 F oven until a toothpick inserted into the cake comes out clean, around 35 mins. Let cool for 30 mins and enjoy!

Sous Vide Brisket

Cross section! ( A little bit dry for me, but I’ll improve next time! )

I’ve decided to finally put my sous vide to use and make brisket at home this weekend! While I thought that the brisket tasted too salty and the texture was a bit dry, my family claimed that it was perfect and demolished the entire brisket within a day. Based on the reception and the fact that I still have half a container of rub left, I’ll probably be making this many more times in the future. Next time, I’ll reduce the rub and sous vide for 24 hours instead of 36.

Ingredients

  • Brisket rub (around 3 tbs)
  • 2.5 pounds brisket
  • 1/4 tbs liquid smoke

Procedure

Pat the brisket dry and rub it with a layer of your brisket rub of choice. Place in a gallon zip lock bag and add the liquid smoke. Place in the sous vide set at 155 F for 24 hours.

Once 24 hours is up, place the bag into the fridge and chill at least 4 hours or until the liquid in the bag gels up (that would make it easier to pat dry and form a crust in the oven.) Pat the brisket dry and cover with another layer of rub. Place in an oven set at 300 F for 2 hours or until the brisket’s exterior becomes a deeply burnished color.

Let cool for 30 mins and enjoy!

My Milk Tea Ice Cream!

Chock full of almond cookies, sliced almonds, and swirled with homemade dulce de leche, this milk tea ice cream is my rendition of the disappointing Hong Kong Milk Tea with Almond Cookies from Humphrey Slocombe. I used Salt and Straw’s ice cream base but replaced all the white sugar for black sugar.

Ingredients

Base

  • Β½ cup (100 grams) black sugar
  • 2 tbs milk powder
  • ΒΌ tsp xanthan gum
  • 2 tbs corn syrup
  • 1 1/3 cups whole milk
  • 1 1/3 cups cream
  • 1 tbs good quality black tea (around 2 tea bags)

Mix Ins

  • 1/2-2/3 cup crushed almond cookies
  • 3 tbs dulce de leche
  • 1/4 cup sliced almonds

Procedure

Heat the milk and corn syrup in a pot on medium low heat. Mix sugar, milk powder, and xanthan gum together. Pour the mixture into the milk, mixing all the while. Don’t let it boil. Once all the sugar has dissolved, place the tea in and take off the heat. Add in the cream and transfer to the fridge overnight. The next day, pour the base through a strainer to strain out the tea leaves. Churn the ice cream based on your ice cream machine’s instructions. Once the ice cream has fully churned, dump in your mix ins and stir to combine. Place in your ice cream container and freeze for a minimum of 4 hours before scooping. Or you can eat it it right out of the machine, I won’t judge πŸ™‚

Ice Cream Tips

Looking to up your ice cream game? Here are some tips for getting super smooth, rich, and creamy ice cream every time.

  1. Get an ice cream machine. I have tried making ice cream with many different methods and this leads to the best results by a long shot. The ice cream is lighter, creamier, smoother, and just so much better. Trust me on this. If you want to save money, there are tons of perfectly good ones at local thrift stores.
  2. Chill your base overnight. This helps develop the flavors, make sure your ice cream base is cold enough, and create a smoother texture.
  3. To add on to the last tip, just make sure EVERYTHING is as cold as possible. Chill your ice cream container. Chill the machine. Chill your mix ins. Turn your freezer to the lowest setting. This ensures that the ice cream will not melt as much during the process, thus decreasing the formation of large ice crystals.
  4. Add a stabilizer. Have your ever made ice cream and be happy with its consistency when it comes out of the machine, only to find that it becomes an icy mass after a few days in the freezer? A stabilizer will fix it. Usually in the form of egg yolks, guar gum, or xanthan gum, these will help keep the ice cream stable and prevent the formation of large ice crystals in the ice cream for up to a month, drastically improving its shelf life.
  5. Do not deviate from the recipe. Ice cream is a science. If you add less sugar or less cream, it will upset the delicate balance of fat, non-milk solids, and liquids in the base. Your ice cream will most likely suck.
  6. Add your mix ins last. If you have mix ins, do not add them first because they will get crushed when churning and may even prevent the ice cream from churning up properly.

Good luck on making ice cream!

A Better Milk Tea Ice Cream!

Picture borrowed from Foodbeast.

There was an ice cream at Whole Foods that I wanted to try for 2 years. Every time I passed the ice cream isle it called out to me, tempting me to buy it. Every time I would open the door of the freezer and reach for it, only to stop upon seeing its massive price tag. $10 for one pint?! I can buy a few gallons of perfectly good ice cream with that money. Thus, my immense desire to try it remained unsatisfied for 2 entire years.

Until the one day it went on sale.

I was strolling along the ice cream isle again with my mom, not even bothering to look at the ice creams, afraid that I would be tempted to splurge and buy a pint. However, my curiosity got the best of me and I stole a glance. There it was, the Humphry Slocombe Hong Kong Milk Tea ice cream, sitting like a coveted jewel behind the glass doors of the freezer and it was ON SALE! Not by much though. However, $8.50 a pint was enough for me to ask my mom to finally buy it.

I happily took my prize home and immediately tried a spoonful. Two years of expectations resulted in the most disappointing spoonful of ice cream that I have ever eaten. The tea flavor was there and it was pleasantly sweet, but the icy texture and the complete absence of the almond cookies made me seriously regret splurging that $8.50. It had so much potential but sadly was a total flop.

I therefore decided to make it up to myself and remake one at home, this time with better texture, more almond cookies, sliced almonds, and swirled with dulce de leche.

Recipe in next post.

Image result for humphry slocombe hong kong milk tea
The ice cream in its case.
Picture taken from twitter.