Jam Bars

Blueberry jam bars, healthy and tasty!

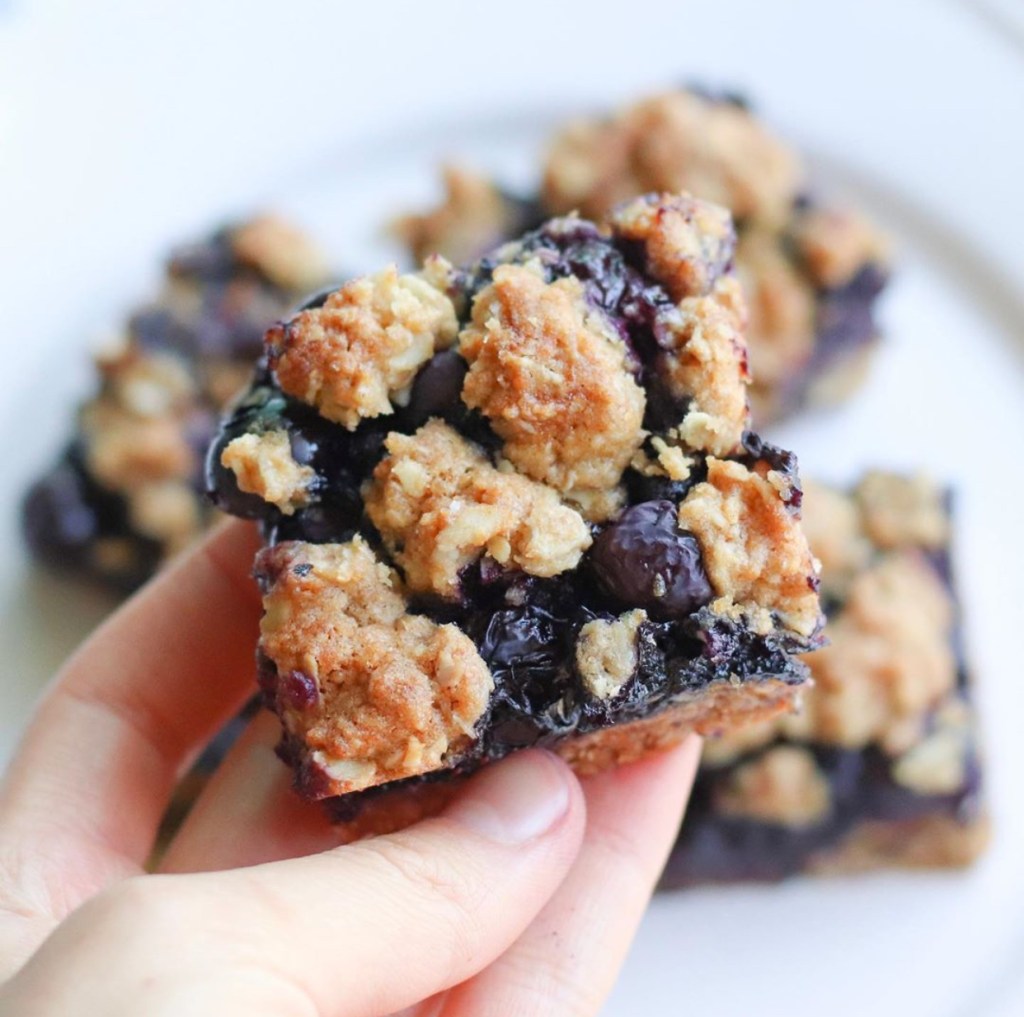
Since I made WAY TOO MUCH jam during the summer (I must get to the blueberries in my backyard before the squirrels do!) I decided to make them into jam bars!! I replaced the regular all purpose flour with oat and almond flour, adding both nutrition and flavor. They are also gluten free and potentially vegan, so you can satisfy your sweet tooth without worrying too much about the negative health affects. Make them to eat as a quick breakfast or an afternoon snack!

Ingredients

  • 110g unsalted butter or coconut oil, at room temperature
  • 85g almond butter
  • 2 tbsp maple syrup
  • 150g rolled oats
  • 120g almond flour
  • 120g oat flour
  • 90g granulated sugar
  • 1/2 tsp salt
  • 340g jam (any is fine, you can also mix in some fresh fruits as well, just not too much because fresh fruits will exude liquid while baking, potentially making the bars mushy)

Procedure

  1. Combine the butter or coconut oil, almond butter, and maple syrup in a large bowl and, using a wooden spoon, mix well.
  2. Add the rolled oats, almond flour, oat flour, sugar, baking powder, and salt into the butter mixture and stir until a soft dough forms. Divide the dough into thirds. Press two-thirds of the dough into the bottom of the prepared pan and reserve the remaining one-third for the topping.
  3. Spread the jam mixture evenly over the bottom crust. You can also combine the jam with some fresh fruits as well–that was what I did in the above photo!
  4. Crumble the remaining one-third dough over the jam filling.
  5. Bake the jam bars until golden brown around the edges, about 35 minutes at 350F. Let the pastry cool completely in the pan on a wire rack before cutting into bars.

Christmas at Stonemill

I spent several days of winter break to help out at Stonemill during the busy holiday season! Orders were coming in like crazy– one person asked for 5 loaves of milk bread, and multiple orders of several other items (I don’t remember too well) on the day before Christmas on Caviar (the delivery app)! The order was so long that we had to hold the piece of paper out while the order machine was spluttering away as to not let the paper touch the ground.

For this holiday season we made a chocolate ginger buche de noel (literally meaning Christmas log) , our version of the traditional Christmas cake that Parisian pastry shops would offer during the holidays! I am actually not a fan of ginger but it still tasted pretty good in my opinion, the deep chocolate really paired well with the spiciness that ginger adds. Perhaps I may should experiment with ginger in my future desserts (maybe with sesame and strawberry?)

By the way, look what Mikiko gave me for Christmas! It was her old book “The Last Course” by Claudia Fleming that guided her during her early pastry days. She got all the famous pastry chefs in SF to sign it for me as well. What is more, she also gave me a box of chocolates from Dandelion Chocolate, the bean to bar chocolate company down the street (and one of the best chocolate producers in America!) It was literally the most heartfelt present that I have received and I was on the verge of tears when she gave it to me. Ahh I need to think of a good present to give her now!! (´^ ω ^`)

The Last Course cookbook!
Imagine my squeals of delight when I saw the signatures of all my favorite pastry chefs in the book!

Rice Flour Tres Leches Cake

My grandparents gave me a huge bag of rice flour a few years ago and I decided this weekend that it was finally the time to use it up.

I made a coconut syrup soaked rice flour sponge filled with vanilla crème diplomat and homemade dulce de leche. The rice flour made the chiffon drier and springier than usual,. It also added a very pleasant aroma that paired very well with the coconut and mango. However, due to the compromise in texture, I won’t use it for making cakes again.

Ingredients

Sponge

  • 8 egg yolks
  • 40g sugar
  • 66ml vegetable oil
  • 160ml coconut milk
  • 194g rice flour
  • 8 egg whites
  • 1/2 tsp cream of tartar
  • 66g sugar

Soak

  • 236 ml coconut milk
  • 50g sugar

Filling

  • 625 g pastry cream
  • 236 ml whipping cream
  • 3/4 tsp gelatin
  • 2 tbs water

Toppings

Mango and dulce de leche

Procedure

For the sponge, whisk the egg yolks, sugar, oil, and rice flour together. Add the milk gradually, whisking all the while. In another bowl, beat the egg whites with the sugar and cream of tartar until medium peaks. Gradually add the egg whites to the flour mixture, making sure that the batter deflates as little as possible. Pour into an 8 by 8 inch square pan and bake at 325 F for 25 mins.

For the soak, mix the sugar with the coconut milk until the sugar fully dissolves.

For the cream, bloom the gelatin in the water. Transfer about 1/2 cup of the pastry cream to a water bath and heat until hot to the touch, about 5 mins. Add the bloomed gelatin and whisk until the gelatin dissolves into the cream. Immediately transfer the hot pastry cream into a bowl and whisk in the rest of the pastry cream to cool it down. In another bowl,beat the heavy cream until medium peaks and carefully fold into the pastry cream mixture.

For assembly, cut the sponge into 3 even layers. Soak the first layer with 1/3 of the coconut soak and spread 2 tbs of dulce de leche on top. Top with half of the cream mixture and add your second layer of cake. Soak the 2nd layer and spread another 2 tbs of dulce de leche. Add your other half of the cream mixture and top with your final cake layer. Soak your final cake layer and chill the cake in the fridge until the cream sets, at least 4 hours. Serve with fresh whipped cream and mangoes. Enjoy!

Tart Eclipse

Here is a tart eclipse art project that I did for my English project for the novel Invisible Man by Ralph Ellison, demonstrating blindness and invisibility to myself!

I baked a bunch of tarts before hand, filled them with pastry cream, photographed all of them with different amounts of cocoa powder dusted on, and photo shopped them all together. Besides being visually pleasing, they were quite tasty as well!

Jam Tips

Fall is in the air and jams and jellies are one of the best ways to capture the essence of summer to brighten cold winter days . Here are some tips to cook jam that sets up perfectly while still maintaining its fresh fruit flavor.

Know the pectin content of your fruits.

Different fruits contain different amounts of pectin. With pectin low fruits, you may need to add additional pectin (be it in the form of commercial pectin, lemon peels, or apple jelly) in order for your jam to set up properly. Examples of pectin high fruits are apples, plums, and blueberries while pectin low fruits include strawberries, melons, and grapes.

Rely on the freezer test

To test whether your jam has set correctly, place a few metal spoons in the freezer to keep cold while you cook the jam. When your think the jam is ready, dip an ice cold spoon in the jam and place it back in the freezer for a few minutes. Through this process, you are essentially super cooling the jam in order to see how it sets at room temperature. If it is too runny, cook for a few more minutes. If it is too hard, then the jam is overcooked.

Use high heat

DO NOT heat your jam to a gentle boil. This will cook off all the fresh fruit flavors of the jam and will instead result in a sticky, candy-like sauce. Aggressively boil the jam to quickly evaporate the water within.

Use a candy thermometer

Pectin sets at around 212 F so candy thermometers are helpful when determining when to start freezer testing the jam. This helps prevent jam from being overcooked.

Milk Bread

Fluffy and soft bread!

Ingredients

Tangzhong

  • 20g bread flour
  • 100mL whole milk

Final Dough

  • 380g bread flour (about 3 cups)
  • 200mL whole milk
  • 75g granulated sugar (about 6 tbsp)
  • 50g egg (1 large)
  • 5g instant yeast
  • 5g salt
  • 28.5g butter (2 tbsp)
  • all of the tangzhong

Procedure

  1. Mix the tangzhong ingredients in a microwaveable bowl. Microwave for around 2 minutes, until the mixture has thickened and turned almost translucent.
  2. Combine all the final ingredients in a bread machine or stand mixer and knead for about 20 mins.  To test the dough, tear off a small piece and stretch gently in all directions; when the dough is ready, it can be pulled into a thin, translucent sheet.
  3.  Lightly grease a medium bowl, then add the dough. Cover and proof at room temperature until doubled in bulk. To test the dough, poke it gently with a flour-dusted fingertip; when the dough is ready, it will retain a shallow impression that springs back after a few minutes.
  4. Turn the dough onto a work surface with just the barest sprinkling of flour, and knead for a few seconds to deflate; this creates a more uniform crumb in the loaf by eliminating large pockets of air.
  5. Divide the dough into 3 pieces, rolling each into a long rectangle and then rolling it up. Nestle into a lightly greased loaf pan, seam side down, then cover and proof as before.
  6. When the dough is ready, uncover and bake at 325F until well-risen, golden brown, and hollow sounding when thumped; about 30 minutes. Enjoy!

Whole Wheat Honey Rolls

My parents don’t like sweets, but they are suckers for bread. Pastries, cakes, and puddings are quickly given away or may be left, untouched, on the counter for days, yet bread never seems to last a day in the house. It was the case for these rolls too. On our day trip to 17 Mile Drive, my family snacked on these rolls while listening to the Sherlock Holmes audio book, looking at the beautiful coastal scenery as we drove by, wrapped tight and cozy in our car.

Ingredients

  • 300g ( 1–1/3 cups ) water, at room temperature
  • 11g ( 3 tsps ) instant yeast
  • 100g ( 1/3 cup ) honey
  • 555g ( 4–1/4 cup ) white whole wheat flour
  • 56g ( 1/2 stick ) Butter, at room temperature
  • 10g ( 2 tsps ) Salt
  • 1 egg, beaten

Procedure

Place all ingredients in a bread machine and knead until it passes the windowpane test. Let the dough rest at room temp for 1.5 hours. Divide into 14 balls and place in a cake pan or skillet (like I did!) Let rise for a final proof for 1 hour, and preheat the oven to 400F. Brush with one layer of egg wash and bake rolls for 10-12 mins. Wait to cool for at least 15 mins and enjoy!

Sticky Toffee Pudding

As weird as it seems, dates are one of my least favorite dried fruits. They are too mushy, too sweet, with no form of acid to brighten anything up. However, they do taste delicious baked into a pudding (such as this one) ! As the weather is getting colder, it is so comforting to eat something warm and sweet as a dessert or after school snack. Be sure to try it out!


Ingredients

  • 225g pitted dates
  • 170g sugar
  • 85g butter
  • 2 eggs
  • 170g whole wheat pastry flour
  • 1 tsp baking soda
  • 1 tsp baking powder
  • 1/4 tsp cinnamon
  • 1/4 tsp ginger
  • 40g plain yogurt (any fat percentage)
  • 30g crushed toasted nuts

Procedure

First, soak the dates in a cup of boiling water for a minute. Once nice and soft, take them out and puree until smooth. In a mixer, beat together the butter and sugar until light and fluffy. Add eggs one at a time and then add the date puree and yogurt. Continue mixing until homogeneous. In another bowl, mix together the dry ingredients. Dump into the wet ingredients and mix until smooth. Distribute batter between muffin tins and bake at 350F for 20-25 minutes, until a toothpick comes out clean. Drizzle with toffee sauce and crushed nuts and enjoy while warm!

Cornmeal Macarons

I’d be lying if I said these were easy. If you’ve mastered macarons and are ready for a challenge, welcome to the next level. There might be a few fails along the way to get the correct consistency, but they are totally worth it. They have an addictively nibby texture and distinctly corn bread-like flavor, one of my favorite cookies of all time!

Ingredients

  • 115g medium grind cornmeal
  • 230g powdered sugar
  • 7g neutral flavored oil
  • 144g egg whites
  • 72g sugar
  • the scrapings of 1 vanilla bean or 2 tsp vanilla extract
  • 2g kosher salt

Procedure

To get started, combine the cornmeal, powdered sugar, and oil in a food processor and pulse until homogeneous. Sift and set aside. In the bowl of a stand mixer, combine the egg whites, sugar, vanilla bean (not the extract), and salt and turn the mixer to medium (4 on a Kitchen Aid). Whip for 3 minutes, then increase the speed to medium-high (7 on a Kitchen Aid) and whip another 3 minutes. Crank the speed to 8 for go another 3 minutes. Finally, turn the mixer to high (level 10) and whip one more minute. Now add in the dry ingredients all at once and incorporate with a rubber spatula. Fold until you get a runny consistency, around 75 strokes (perhaps a bit more since the cornmeal batter sometimes behaves funny)

Transfer half the batter to the piping bag and pipe the batter into rounds on the baking sheets.After piping, take hold of the sheet pan and rap it hard against the counter. Rotate the pan one hundred and eighty degrees and rap again. This will dislodge any large air bubbles that might cause your macarons to crack.

Bake for about 18 minutes at 300F , or until you can cleanly peel the macarons away from the parchment paper. Cool thoroughly.

Fill with your favorite cream and enjoy!

No Pectin Cheater Jam

This is great for when you have a large amount of flavorless grocery store fruits that will flop if baked in a fruit-centric dessert, such as pie or cobbler. I made this using peaches that my grandparents got from the food bank, feel free to use any sort of crappy jam making fruit you have around the house.

Ingredients

  • Bad, bland fruit (not rotten though!)
  • Sugar in weight that is 0.4 times the fruit
  • Store bought jam

Procedure

Cut up your fruit into small pieces and add the sugar. Leave to rest in the fridge for 24 hours. This draws out the water from the fruit so you don’t need to cook it down as much. You do not want to lose the little flavor there is in the fruit through excessive cooking. Place the fruit in a medium saucepan on medium heat with the juices and cook until there is foam that appears on top. Skim off the foam and keep cooking until the mixture has thickened slightly. Continue skimming off foam in the process. Add the store bought jam and stir until homogeneous. Place in jar and continue with canning procedures or simply place in fridge if you know you will use it up quickly. Enjoy on cake, scones, toast, ….. everything really!